Installation
Step-by-step guidance for easy setup
Tools you will need:
With a 1/8” drill bit (for pilot holes) and a Phillips head bit
* Cloth tapes are not accurate enough
For marking bracket holes
Crucial for ensuring the shade hangs straight
Phillips and Flathead
If your windows are tall
If you are not drilling into wood studs
2 BRACKET INSTALLATION

Shades 40″ or narrower include 2 brackets. For optimal support, position brackets 4-5 inches from the side edges of the frame. This ensures the weight is evenly distributed across the Cassette.
3 BRACKET INSTALLATION

Shades 40″ or narrower include 2 brackets. For optimal support, position brackets 4-5 inches from the side edges of the frame. This ensures the weight is evenly distributed across the Cassette.
DELTA CLASSIC SHADES INSTALLATION GUIDE
DELTA CLASSIC SHADES CONSISTS OF THE FOLLOWING:
- SOLAR SHADES
- HONEYCOMB SHADES
DELTA CLASSIC SHADES MOUNTING HARDWARE
This Installation Guide can be downloaded HERE
This Remote Control Setup Guide can be downloaded HERE
A. L BRACKET
B. SCREWS
C. CONTINUOUS CORDED LOOP TENSIONER

INSIDE MOUNT

1. Before marking or drilling, dry-fit the brackets and cassette against the mounting surface.
This ensures perfect alignment and a smooth installation.

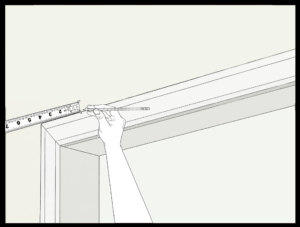
2. Secure the brackets by drilling directly into the top surface of the window frame casing.

3. Hook the front edge of the cassette onto the brackets, then pivot the unit upward until it snaps securely into place.
Give the Cassette a gentle tug to verify it is fully locked.

4. If you are installing a corded shade, it will include a cord tensioner. Secure the cord tensioner to the wall. The cord should be snug enough to eliminate loops and allow the shade to operate smoothly.
This installation is required to ensure proper mechanical function and to maintain strict child safety compliance.
OUTSIDE MOUNT

1. Before marking or drilling, dry-fit the brackets and cassette against the mounting surface.
This ensures perfect alignment and a smooth installation.

2. Secure the brackets by drilling directly into the wall surface. Ensure you are drilling into a solid surface or a wall stud for maximum stability.
If a stud is not available, you must use heavy-duty metal sheetrock anchors to prevent the brackets from pulling loose.

3. Hook the front edge of the cassette onto the brackets, then pivot the unit upward until it snaps securely into place.
Give the Cassette a gentle tug to verify it is fully locked.

4. If you are installing a corded shade, it will include a cord tensioner. Secure the cord tensioner to the wall. The cord should be snug enough to eliminate loops and allow the shade to operate smoothly.
This installation is required to ensure proper mechanical function and to maintain strict child safety compliance.
DELTA ARTISAN SHADES INSTALLATION GUIDE
DELTA ARTISAN SHADES CONSISTS OF THE FOLLOWING:
- ROLLER SHADES
- ZEBRA SHADES
- TRIPLE/SHEER SHADES
DELTA ARTISAN SHADES MOUNTING HARDWARE
This installation guide can be downloaded HERE
This Remote Control Setup Guide can be downloaded HERE
A. L BRACKET WITH MOUNTING BRACKET
B. SCREWS
C. CONTINUOUS CORDED LOOP TENSIONER

INSIDE MOUNT: For an inside mount installation you may only need to install the ceiling bracket. It will look like the following.


1. Before marking or drilling, dry-fit the brackets and cassette against the mounting surface.
This ensures perfect alignment and a smooth installation.

2. Secure the brackets by drilling directly into the top surface of the window frame casing.

3. Hook the back edge of the cassette onto the brackets, then pivot the unit upward until it snaps securely into place.
Give the Cassette a gentle tug to verify it is fully locked.

4. If you are installing a corded shade, it will include a cord tensioner. Secure the cord tensioner to the wall. The cord should be snug enough to eliminate loops and allow the shade to operate smoothly.
This installation is required to ensure proper mechanical function and to maintain strict child safety compliance.
OUTSIDE MOUNT: For an outside mount installation you will need to assemble and install the l bracket and mounting bracket as follows.
Ceiling/L Brackets. Figure Shows two you may receive more for each blind depending if it requires a third for longer shades.

Take one of each of the brackets and twist and turn the ceiling bracket on to the L Bracket. Make sure to turn the release tab towards the front

This assembled bracket allows the customer to mount the shades to the wall where the brackets can only installed on the wall.
1. Before marking or drilling, dry-fit the brackets and cassette against the mounting surface.
This ensures perfect alignment and a smooth installation.

2. Secure the brackets by drilling directly into the wall surface. Ensure you are drilling into a solid surface or a wall stud for maximum stability.
If a stud is not available, you must use heavy-duty metal sheetrock anchors to prevent the brackets from pulling loose.

3. Hook the back edge of the cassette onto the brackets, then pivot the unit upward until it snaps securely into place.
Give the Cassette a gentle tug to verify it is fully locked.
4. If you are installing a corded shade, it will include a cord tensioner. Secure the cord tensioner to the wall. The cord should be snug enough to eliminate loops and allow the shade to operate smoothly.
This installation is required to ensure proper mechanical function and to maintain strict child safety compliance.
→ Troubleshooting & Pro-Tips
- For Shallow Window Frames: If your window casing lacks depth for a standard inside mount, try angling your screws slightly upward when drilling. This allows the hardware to grip the solid wood header above the frame for a more stable installation.
- For Outside Mount Fabric Coverage: Keep in mind that for roller or solar shades, the actual material is typically 1 to 1.5 inches slimmer than the total bracket width. Position your brackets slightly wider than the window opening to ensure the glass is completely obscured.
Common Questions
Answers to what customers ask most
Do I need to drill directly into my window frame?
Yes. For an inside mount, brackets are typically screwed into the top of the window casing. Ensure your window frame depth is sufficient to hold the bracket securely.
My window frame is very shallow. How do I install the brackets?
If the frame is shallow, you may need to drill your screws at a slight upward angle to ensure they bite securely into the wood header above the frame. This technique helps prevent the wood casing from splitting.
How do I ensure my valance fits properly?
If your blinds include a decorative valance, install your mounting brackets slightly deeper into the window frame (further back from the edge). This leaves enough clearance for the valance clips and the valance itself to sit flush with the wall or frame without protruding awkwardly.
How high above the window should I install the brackets?
The standard recommendation is to mount brackets 1.5 to 3 inches above the top of the window frame. This height minimizes light gaps at the top and allows the shade to stack tightly above the window when fully raised, preserving your view.
Why is my roller shade fabric narrower than the width I ordered?
For outside mount roller shades, the “ordered width” is typically the bracket-to-bracket distance. The actual fabric is often 1 to 1.5 inches narrower to accommodate the operating mechanism. You may need to adjust your mounting width wider to ensure the glass is fully covered.
How do I make sure the shades are centered?
Measure 2–3 inches (or your desired overlap) outwards from both sides of the window casing and mark these points. Place your headrail or a long level across these two marks to verify they are perfectly level with each other before drilling your pilot holes.
I am installing into drywall and cannot find a stud. What should I do?
You must use heavy-duty wall anchors (e.g., toggle bolts or self-drilling metal anchors). Standard plastic plugs or screws alone will eventually pull out of the drywall due to the weight and daily operation of the blinds.
What are the child safety requirements for blind cords?
- Loose Cords: Install a cord cleat high on the wall (out of children’s reach) and wrap excess cords around it.
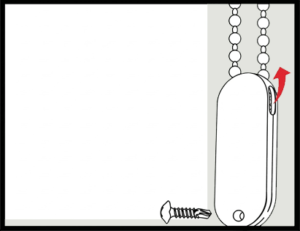
- Continuous Loops: You must install a tension device (a plastic clip at the bottom of the loop) directly into the wall or window frame. This keeps the chain taut and prevents it from becoming a strangulation hazard. Note: Many shades will not operate smoothly if this tension is not applied.
My shade isn't hanging straight. How do I fix it?
This is almost always due to the brackets not being level. Use a spirit level to check the top of the headrail. If one side is lower, loosen the mounting screws slightly and shim the bracket or adjust its position before tightening it again.